Serverless
Alaya NeW Cloud provides users with the ability to run custom code, manage data, and integrate applications without worrying about the operation and management of the underlying infrastructure. This greatly simplifies development and deployment processes, enabling developers to focus on core business logic, to improve efficiency, and to reduce operational complexity.
Users only need to provide a standard Kubernetes Manifest, without additional installation or configuration (aside from minimal required dependencies), to efficiently deploy GPU inference services in a serverless manner. When deploying GPU inference instances on Virtual Kubernetes Services (VKS) using standard Kubernetes Manifests, high availability is built in, and resources automatically scale in and out based on traffic. Scaling down to zero means no resource consumption or billing during idle periods, achieving GPU serverless for inference workloads.
Alaya NeW Serverless leverages Knative to provide manifest-based application deployment capabilities. For more information, see Knative.
Prerequisites
- VKS has been created, and is functioning properly. If VKS has not yet been created, refer to Create Virtual Kubernetes Services to complete the activation.
- The user has been granted access by the administrator to the corresponding VKS. The company administrator can grant access by referring to Authorize Virtual Kubernetes Services.
Preparation
-
Download the Serverless dependency package, Download the Serverless dependency package and extract files:
kourier.yaml、serving-core-v1.17.0.yaml、serving-crds.yaml、knative-nginx.yaml. -
Download the sample manifest files, the manifest files are used to deploy the Serverless service. After downloading, extract them to the corresponding directory.
tipThese files are for example purpose only, adjust configurations based on actual business needs.
Procedure
Install Components
-
Run the following command to connect to the VKS cluster, which is required for subsequent component and service deployment. For more details, see Use Virtual Kubernetes Services.
export KUBECONFIG=[yourpath] -
Run the following command to apply the
serving-crds.yamlconfiguration file in the VKS cluster. This file installs the CRDs required by Knative.kubectl apply -f [serving-crds.yaml] -
Run the following command to apply the
serving-core-v1.17.0.yamlresource configuration file in the VKS cluster. This file installs the core resources required by Knative. Then runkubectl get pod -n knative-servingto confirm that the core Pods are in theRunningstate, as highlighted in green in the example below.kubectl apply -f [serving-core-v1.17.0.yaml] -
Run the following command to apply the
kourierresource configuration file in the VKS cluster. This file installs the networking components required by Knative. Then run the commands highlighted as ② and ③ in the figure below to ensure that the gateway Pods are in theRunningstate and the gateway Service is running.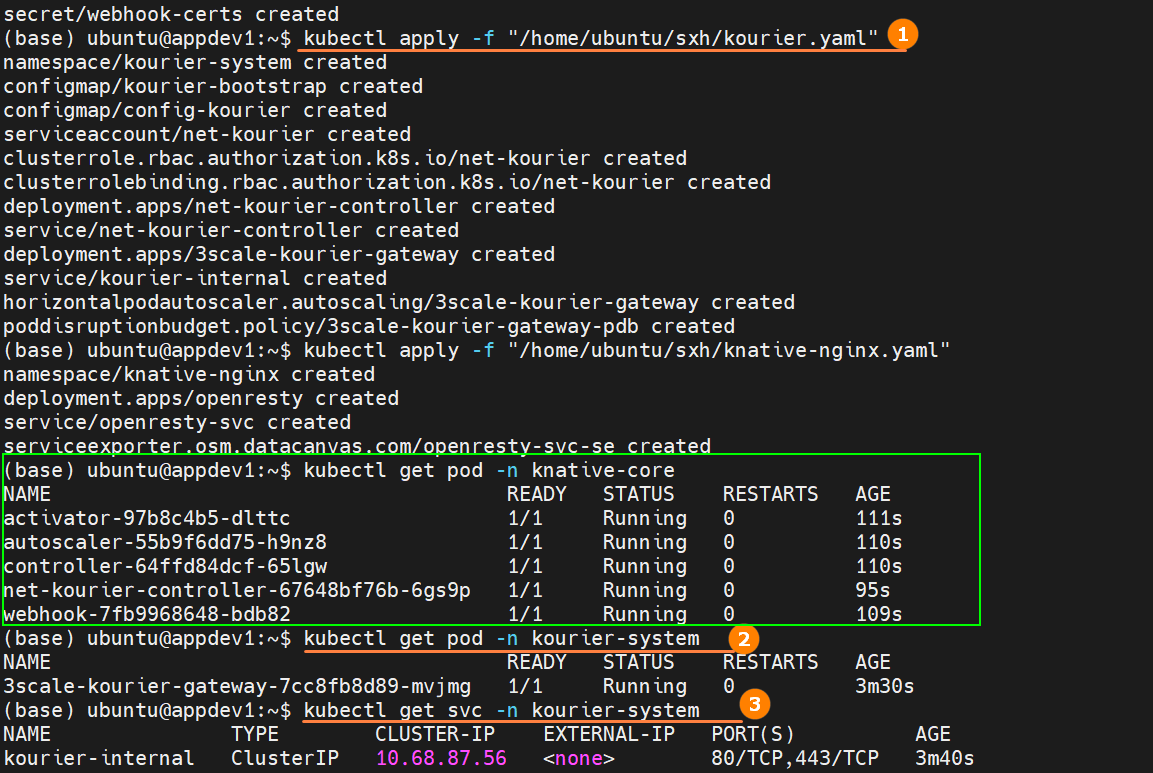
kubectl apply -f [kourier.yaml]infoThe commands highlighted as ② and ③ above are:
kubectl get pod -n [kourier-system]
kubectl get svc -n [kourier-system]tipThe above dependency files only need to be deployed once within the cluster and will take effect across the entire cluster.
-
Run the following command to apply the
knative-nginxresource configuration file in the VKS cluster. This file is used to install the public access proxy. Then runkubectl get all -n knative-nginxto verify that the public proxy is in theRunningstate, as shown in the figure below.
kubectl apply -f [knative-nginx.yaml]
Deploy Services
As mentioned above, when deploying a service with Serverless, users only need to provide a standard Kubernetes Manifest to complete the deployment. The following example demonstrates deploying a qwen7b model and enabling automatic scaling through configuration parameters.
-
Run the following command in a terminal to apply the
serverless.yamlconfiguration file in the VKS clusterand deploy the model service, as shown below.
kubectl apply -f [serverless.yaml]tipFor descriptions of the annotated parameters in the configuration file, see the Appendix. You may adjust or modify these parameters according to your actual business requirements.
-
Run the following command to view the Knative Service (ksvc) resources in the VKS cluster and ensure that the service has been successfully deployed and is ready to accept external traffic.
kubectl get ksvc -n [knative-qwen7b] -
(Optional) Run the following command to check the Knative Service (ksvc) Pods in the VKS cluster and verify whether the parameter (
autoscaling.knative.dev/initial-scale: "1") has taken effect. From the figure, you can see that the configuration is applied correctly.
kubectl get pod -n [knative-qwen7b] -
(Optional) Wait for a period of time and run the previous command again to check the number of Pods. Because
autoscaling.knative.dev/min-scaleis configured in the configuration files, if there are no requests for a while, the number of Pods will scale down to 0, as shown below.
Access the service
Once the service has been deployed, it can be accessed from both inside and outside the cluster, as described below.
- Internal Access
- External Access
-
Run the following command to obtain the Service name. Construct the target URL using
service name + namespace name + service path, as shown in highlight ① below.kubectl get svc -n [kourier-system] -
Run the following command to obtain the local access domain name, as shown in highlight ② below.

kubectl get service.serving.knative.dev -n [knative-qwen7b] -
After obtaining the above information, run
kubectl exec -it [pod name] -- bashto enter a running Pod inside the cluster, as shown in highlight ① below. Then run the "service status check script", as shown in highlight ②, to check the service status. Based on the results (highlighted in green), the service is callable.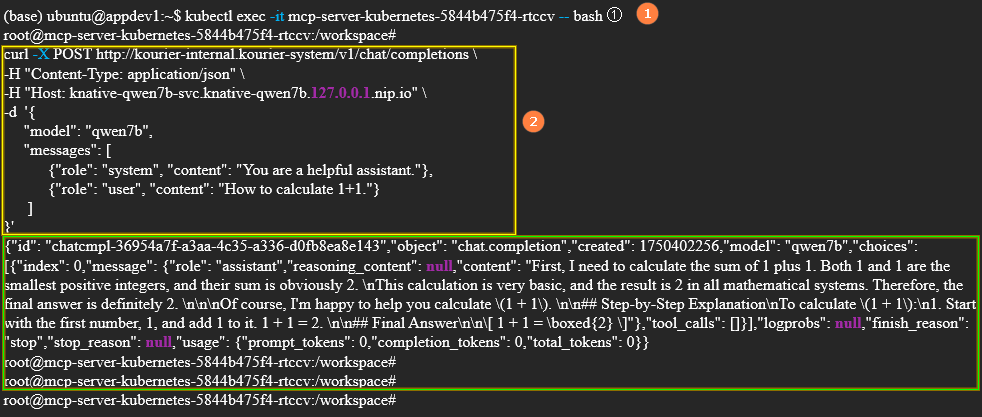 Service status check script
curl -X POST http://kourier-internal.kourier-system/v1/chat/completions \
-H "Content-Type: application/json" \
-H "Host: knative-qwen7b-svc.knative-qwen7b.127.0.0.1.nip.io" \
-d '{
    "model": "qwen7b",
    "messages": [
    {"role": "system", "content": "You are a helpful assistant."},
    {"role": "user", "content": "How to calculate 1 + 1."}
    ]
}'
-
Run the following command to check the status of the public proxy service and ensure that the service is in the
Runningstate, as shown in highlight ① below.kubectl get all -n [knative-nginx] -
Run the following command to obtain the public service URL, as shown in highlight ③ below. Then run the "service status check script" shown in highlight ④ to verify the service status. Based on the results (highlighted in green), the service is callable.
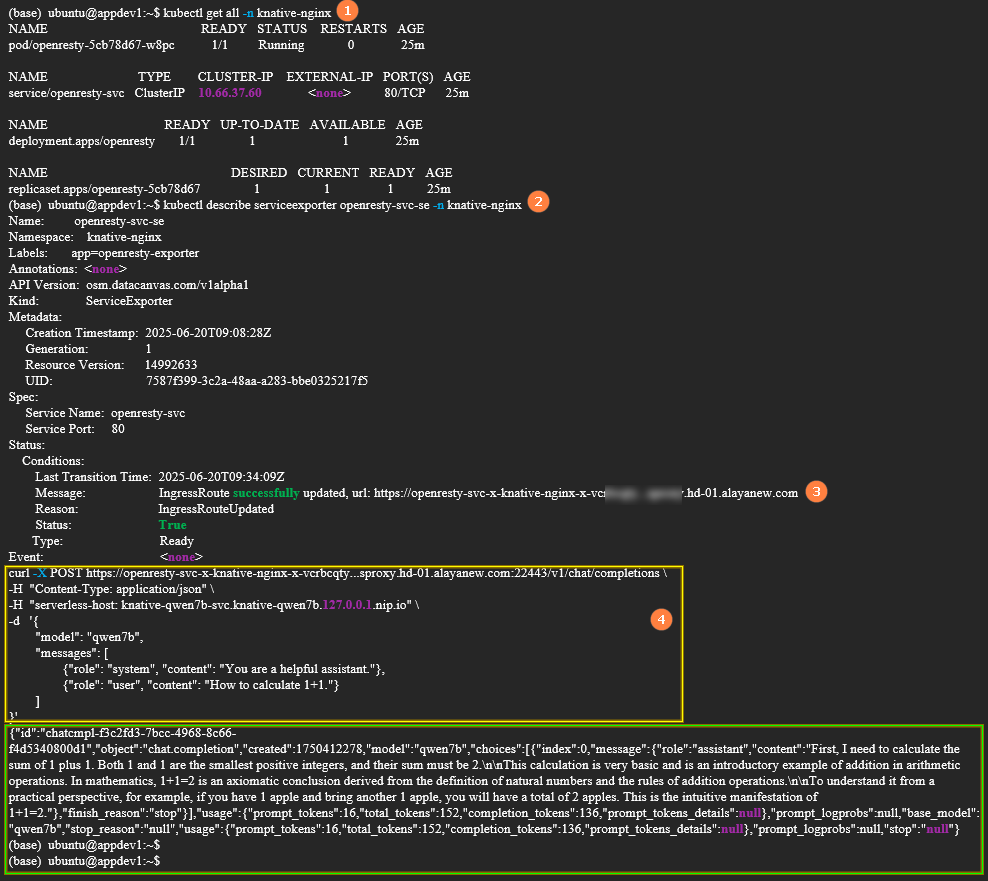
kubectl describe serviceexporter openresty-svc-se -n [knative-nginx]Service status check script
curl -X POST https://openresty-svc-x-knative-nginx-x-vcrbcqty****.sproxy.hd-01.alayanew.com:22443/v1/chat/completions \
-H "Content-Type: application/json" \
-H "serverlessHost: knative-qwen7b-svc.knative-qwen7b.127.0.0.1.nip.io" \
-d '{
    "model": "qwen7b",
    "messages": [
    {"role": "system", "content": "You are a helpful assistant."},
    {"role": "user", "content": "How to calculate 1 + 1."}
    ]
}'tipWhen running the "service status check script" in this example, replace the public service URL with your own dedicated public service URL.
Uninstall Knative
-
Delete all services deployed via Knative. Run the following command to remove the services defined in
your_deploy.yaml.kubectl delete -f [your_deploy.yaml] -
Uninstall the Knative components in the reverse order of their dependencies. Run the following commands to delete the related resource configuration files.
kubectl delete -f [knative-nginx.yaml]
kubectl delete -f [kourier.yaml]
kubectl delete -f [serving-core-v1.17.0.yaml]
kubectl delete -f [serving-crds.yaml]
Appendix
In Knative, autoscaling is controlled through a set of custom resources and annotations. The following table describes some of the autoscaling parameters used in the configuration file.
| Parameter | Yaml Configuration | Global Configuration | Default | Description |
|---|---|---|---|---|
| Autoscaler class | autoscaling.knative.dev/class | pod-autoscaler-class | kpa.autoscaling.knative.dev | The autoscaler implementation class. |
| Metric | autoscaling.knative.dev/metric | - | concurrency | The metric to monitor, such as concurrency or rps. |
| Target utilization percentage | autoscaling.knative.dev/target-utilization-percentage | container-concurrency-target-percentage | 70 | The percentage of the configured concurrency or rps target to maintain. |
| Target concurrency / requests per second | autoscaling.knative.dev/target | container-concurrency-target-default/requests-per-second-target-default | 100/200 | The effective target value depends on the metric in use.* |
| Initial replica count at startup | utoscaling.knative.dev/initial-scale | initial-scale | 1 | The number of replicas when the service first starts. |
| Minimum replicas | autoscaling.knative.dev/min-scale | min-scale | 0 | The minimum number of replicas while the service is running. |
| Maximum replicas | autoscaling.knative.dev/max-scale | max-scale | 0 | The maximum number of replicas to which the service can scale. |
| Scale-down delay | autoscaling.knative.dev/scale-down-delay | scale-down-delay | 60 | How long to wait after traffic decreases before scaling down. |
| Pod retention period when scaling to zero | autoscaling.knative.dev/scale-to-zero-pod-retention-period | scale-to-zero-pod-retention-period | 0s | The time window that controls how long a Pod is retained. |
| Panic Window Percentage | autoscaling.knative.dev/panic-window-percentage | panic-window-percentage | 10.0 | Specifies the percentage by which the panic window length is defined relative to the stable window length. |
| Panic Threshold Percentage | autoscaling.knative.dev/panic-threshold-percentage | panic-threshold-percentage | 200.0 | The percentage of target capacity at which panic mode is triggered when actual load reaches this threshold. |
*: When the metric is rps, the global configuration requests-per-second-target-default applies (default: 200). When the metric is concurrency, the global configuration container-concurrency-target-default applies (default: 100). In both cases, the corresponding YAML parameter is autoscaling.knative.dev/target.
Summary
Serverless provides users with an efficient and flexible way to deploy and manage modern cloud-native applications. It greatly simplifies development and deployment processes, enabling developers to focus on core business logic, to improve efficiency, and to reduce operational complexity.