弹性容器集群部署PyTorch实例
PyTorch 是一个开源的机器学习库,在学术界和工业界都得到了广泛的应用,尤其是在自然语言处理(NLP)、计算机视觉(CV)、强化学习等领域。经常与 Jupyter Notebook 结合使用。
在这个简单的例子中,带有 Jupyter 的 PyTorch 实例被部署到 弹性容器集群 并使用 Kubernetes 公开到公共互联网。
前提条件
本教程假定您已经具备以下条件:
- 用户已安装命令行工具(kubectl),如用户尚未安装,可参考安装命令行工具(kubectl)完成安装。
- 用户已开通弹性容器集群,且集群可正常使用。如尚未开通,可参考开通弹性容器集群完成开通。
教程源代码
首先下载本教程所需要的源码文件
清单
本教程包含以下文件,以下是文件的作用说明。
| 文件名 | 功能 |
|---|---|
| Dockerfile | 该文件用来构建docker镜像。 |
| config_harbor_secret.json | 配置与Harbor容器镜像仓库相关的敏感信息。 |
| jupyter_harbor_secret.yaml | 定义secret资源:在部署deployment资源时,用来拉取自定义镜像。 |
| jupyter_deploy.yaml | 定义Deployment资源,该资源定义如何启停Pod。 |
| jupyter_svc.yaml | 定义Service资源,该资源处理网络和发布服务 。 |
| jupyter_serviceexport.yaml | 定义ServiceExporter资源,该资源将服务发布到公网。 |
清单解析
- Dockerfile:基于Pytorch的基础镜像,用来自定义镜像。
- config_harbor_secret.json:在本示例中,该文件配置了harbor镜像仓库的基本信息,用户需将以下信息替换为实际信息。
| 变量名 | 说明 | 来源 | 示例 |
|---|---|---|---|
| your_harbor_server | 镜像仓库访问域名 | 资源中心/存储管理/镜像仓库界面 | https://registry.hd-01.alayanew.com:8443 |
| username | 镜像仓库用户名 | 开通短信 | user |
| password | 镜像仓库密码 | 开通短信 | password |
| 你的邮箱 | abc@hello.com |
- jupyter_harbor_secret.yaml:该文件配置了密码信息,用于存储和管理敏感信息(如密码、API 密钥、证书等)。用户需将以下信息替换为实际信息。
| 变量名 | 说明 | 来源 | 示例 |
|---|---|---|---|
| .dockerconfigjson | 使用base64对config_harbor_secret.json进行编码 | 手动编码 | 0ssdxkcjuielsdjf.... |
- jupyter_deploy.yaml:指定部署信息。用户需将以下信息替换为实际信息。
| 变量名 | 说明 | 来源 | 示例 |
|---|---|---|---|
| image | 镜像名称 | 自定义镜像 | registry.hd-01.alayanew.com:8443/alayanew-dab57f9b-35f5-4dc1-afff-5cfd02esdsfe/pytorch/pytorch:2.5.1-cuda12.4-cudnn9-devel-ssh-1.0 |
| resources.requests.[GPU] | GPU资源信息 | 弹性容器集群/集群详情/算力配置 | nvidia.com/gpu-h800 |
| volumes.persistentVolumeClaim.claimName | pvc名称 | 默认创建的pvc,参考声明存储 | pvc-capacity-userdata |
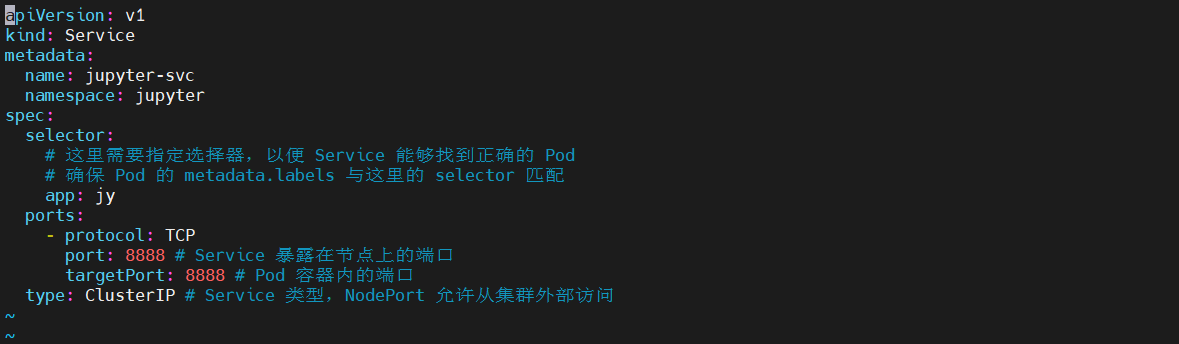
- jupyter_svc.yaml:指定服务信息。本示例定义了一个ClusterIP类型的服务,用于处理Kubernetes中的网络流量,开放TCP端口8888,旨在将部署发布到公共互联网。
发布服务
在本示例中,向公网发布服务由jupyter_serviceexport.yaml指定。
操作步骤
镜像准备
注意: 以下命令中,请将账号,密码,镜像名称,镜像仓库地址等信息替换成你自己的。
# pull image
docker pull pytorch/pytorch:2.5.1-cuda12.4-cudnn9-devel

# build image
docker build -t pytorch/pytorch:2.5.1-cuda12.4-cudnn9-jupyter-devel -f [/path/to/Dockerfile] .

#login
docker login  https://registry.hd-01.alayanew.com:8443/ -u [user] -p [passwd]

# tag
docker tag pytorch/pytorch:2.5.1-cuda12.4-cudnn9-jupyter-devel [registry.hd-01.alayanew.com:8443/alayanew-dab57f9b-35f5-4dc1-afff-5cfd02esdsfe]/pytorch/pytorch:2.5.1-cuda12.4-cudnn9-jupyter-devel

# push
docker push [registry.hd-01.alayanew.com:8443/alayanew-dab57f9b-35f5-4dc1-afff-5cfd02esdsfe]/pytorch/pytorch:2.5.1-cuda12.4-cudnn9-jupyter-devel
k8s资源部署
# 声明弹性容器集群配置
export KUBECONFIG="[/path/to/kubeconfig]"

# 创建namespace
kubectl create namespace jupyter
namespace/jupyter created

# 创建secret
kubectl apply -f jupyter_harbor_secret.yaml
secret/harbor-secret created

# 创建deploy
kubectl apply -f jupyter_deploy.yaml
deployment.apps/jupyter-deploy created

# 创建svc
kubectl apply -f jupyter_svc.yaml
service/jupyter-svc created

# 创建serverexporter
kubectl apply -f jupyter_serviceexport.yaml
serviceexporter.osm.datacanvas.com/jupyter-svc created
查看各类资源
查看所有的pods
# kubectl get pods -n jupyter
NAME                              READY   STATUS    RESTARTS   AGE
jupyter-deploy-576b8fb97d-hnmhq   1/1     Running   0          5m24s
查看deploy
# kubectl get deploy -n jupyter
NAME             READY   UP-TO-DATE   AVAILABLE   AGE
jupyter-deploy   1/1     1            1           5m55s
查看svc
# kubectl get svc -n jupyter
NAME          TYPE        CLUSTER-IP     EXTERNAL-IP   PORT(S)    AGE
jupyter-svc   ClusterIP   10.68.199.68   <none>        8888/TCP   5m40s
查看pod信息
kubectl describe pod jupyter-deploy-576b8fb97d-hnmhq -n jupyter
......
Events:
  Type    Reason          Age    From               Message
  ----    ------          ----   ----               -------
  Normal  Scheduled       6m37s  default-scheduler  Successfully assigned jupyter/jupyter-deploy-576b8fb97d-hnmhq to k8s-mas-gpu-8-78
  Normal  AddedInterface  6m35s  multus             Add eth0 [172.19.129.41/32] from k8s-pod-network
  Normal  Pulling         6m34s  kubelet            Pulling image "registry.hd-01.alayanew.com:8443/vc-huangxs/pytorch/pytorch:2.5.1-cuda12.4-cudnn9-jupyter-devel"
  Normal  Pulled          4m37s  kubelet            Successfully pulled image "registry.hd-01.alayanew.com:8443/vc-huangxs/pytorch/pytorch:2.5.1-cuda12.4-cudnn9-jupyter-devel" in 1m57.624319824s (1m57.624329826s including waiting)
  Normal  Created         4m37s  kubelet            Created container sd-cuda-container
  Normal  Started         4m37s  kubelet            Started container sd-cuda-container
获取jupyter登录令牌
查看Pod的日志以获取Jupyter登录令牌。令牌将作为所服务实例的URL的一部分显示。例如:
# kubectl logs  jupyter-deploy-576b8fb97d-hnmhq -n jupyter
.......
[I 2024-12-10 11:57:27.353 ServerApp] jupyter_lsp | extension was successfully linked.
[I 2024-12-10 11:57:27.355 ServerApp] jupyter_server_terminals | extension was successfully linked.
[I 2024-12-10 11:57:27.358 ServerApp] jupyterlab | extension was successfully linked.
[I 2024-12-10 11:57:27.358 ServerApp] Writing Jupyter server cookie secret to /root/.local/share/jupyter/runtime/jupyter_cookie_secret
[I 2024-12-10 11:57:27.508 ServerApp] notebook_shim | extension was successfully linked.
[I 2024-12-10 11:57:27.517 ServerApp] notebook_shim | extension was successfully loaded.
[I 2024-12-10 11:57:27.518 ServerApp] jupyter_lsp | extension was successfully loaded.
[I 2024-12-10 11:57:27.519 ServerApp] jupyter_server_terminals | extension was successfully loaded.
[I 2024-12-10 11:57:27.520 LabApp] JupyterLab extension loaded from /opt/conda/lib/python3.11/site-packages/jupyterlab
[I 2024-12-10 11:57:27.520 LabApp] JupyterLab application directory is /opt/conda/share/jupyter/lab
[I 2024-12-10 11:57:27.520 LabApp] Extension Manager is 'pypi'.
[I 2024-12-10 11:57:27.549 ServerApp] jupyterlab | extension was successfully loaded.
[I 2024-12-10 11:57:27.549 ServerApp] Serving notebooks from local directory: /workspace
[I 2024-12-10 11:57:27.549 ServerApp] Jupyter Server 2.14.2 is running at:
[I 2024-12-10 11:57:27.549 ServerApp] http://jupyter-deploy-576b8fb97d-hnmhq:8888/lab?token=a346695eeadcc8ee7d8a03ea1a691af9a8d7aa3ff889f1d7
[I 2024-12-10 11:57:27.549 ServerApp]     http://127.0.0.1:8888/lab?token=a346695eeadcc8ee7d8a03ea1a691af9a8d7aa3ff889f1d7
[I 2024-12-10 11:57:27.549 ServerApp] Use Control-C to stop this server and shut down all kernels (twice to skip confirmation).
[C 2024-12-10 11:57:27.551 ServerApp]

    To access the server, open this file in a browser:
        file:///root/.local/share/jupyter/runtime/jpserver-1-open.html
    Or copy and paste one of these URLs:
        http://jupyter-deploy-576b8fb97d-hnmhq:8888/lab?token=a346695eeadcc8ee7d8a03ea1a691af9a8d7aa3ff889f1d7
        http://127.0.0.1:8888/lab?token=a346695eeadcc8ee7d8a03ea1a691af9a8d7aa3ff889f1d7
.....
在这个示例中,令牌为:"a346695eeadcc8ee7d8a03ea1a691af9a8d7aa3ff889f1d7"
获取公网url
# kubectl get serviceexporter -n jupyter
NAME          AGE
jupyter-se-svc   9m3s

# kubectl describe serviceexporter jupyter-se-svc  -n jupyter
Name:         jupyter-se-svc
Namespace:    jupyter
Labels:       <none>
Annotations:  <none>
API Version:  osm.datacanvas.com/v1alpha1
Kind:         ServiceExporter
Metadata:
  Creation Timestamp:  2024-12-11T06:02:39Z
  Generation:          1
  Resource Version:    20756
  UID:                 c60c7e52-0703-40c0-80f4-205a2886a522
Spec:
  Service Name:  jupyter-svc
  Service Port:  8888
Status:
  Conditions:
    Last Transition Time:  2024-12-11T06:02:39Z
    Message:               IngressRoute successfully updated, url: https://jupyter-svc-x-jupyter-x-vc2qofwoe524.sproxy.hd-01.alayanew.com
    Reason:                IngressRouteUpdated
    Status:                True
    Type:                  Ready
Events:                    <none>
在这个示例中,公网的url为:https://jupyter-svc-x-jupyter-x-vc2qofwoe524.sproxy.hd-01.alayanew.com
通过ServiceExporter发布的服务,默认的端口为22443。
所以最终的url为:https://jupyter-svc-x-jupyter-x-vc2qofwoe524.sproxy.hd-01.alayanew.com:22443
登录jupyter
打开浏览器,使用从Pod的日志中获得的登录令牌导航到https://jupyter-svc-x-jupyter-x-vc2qofwoe524.sproxy.hd-01.alayanew.com:22443
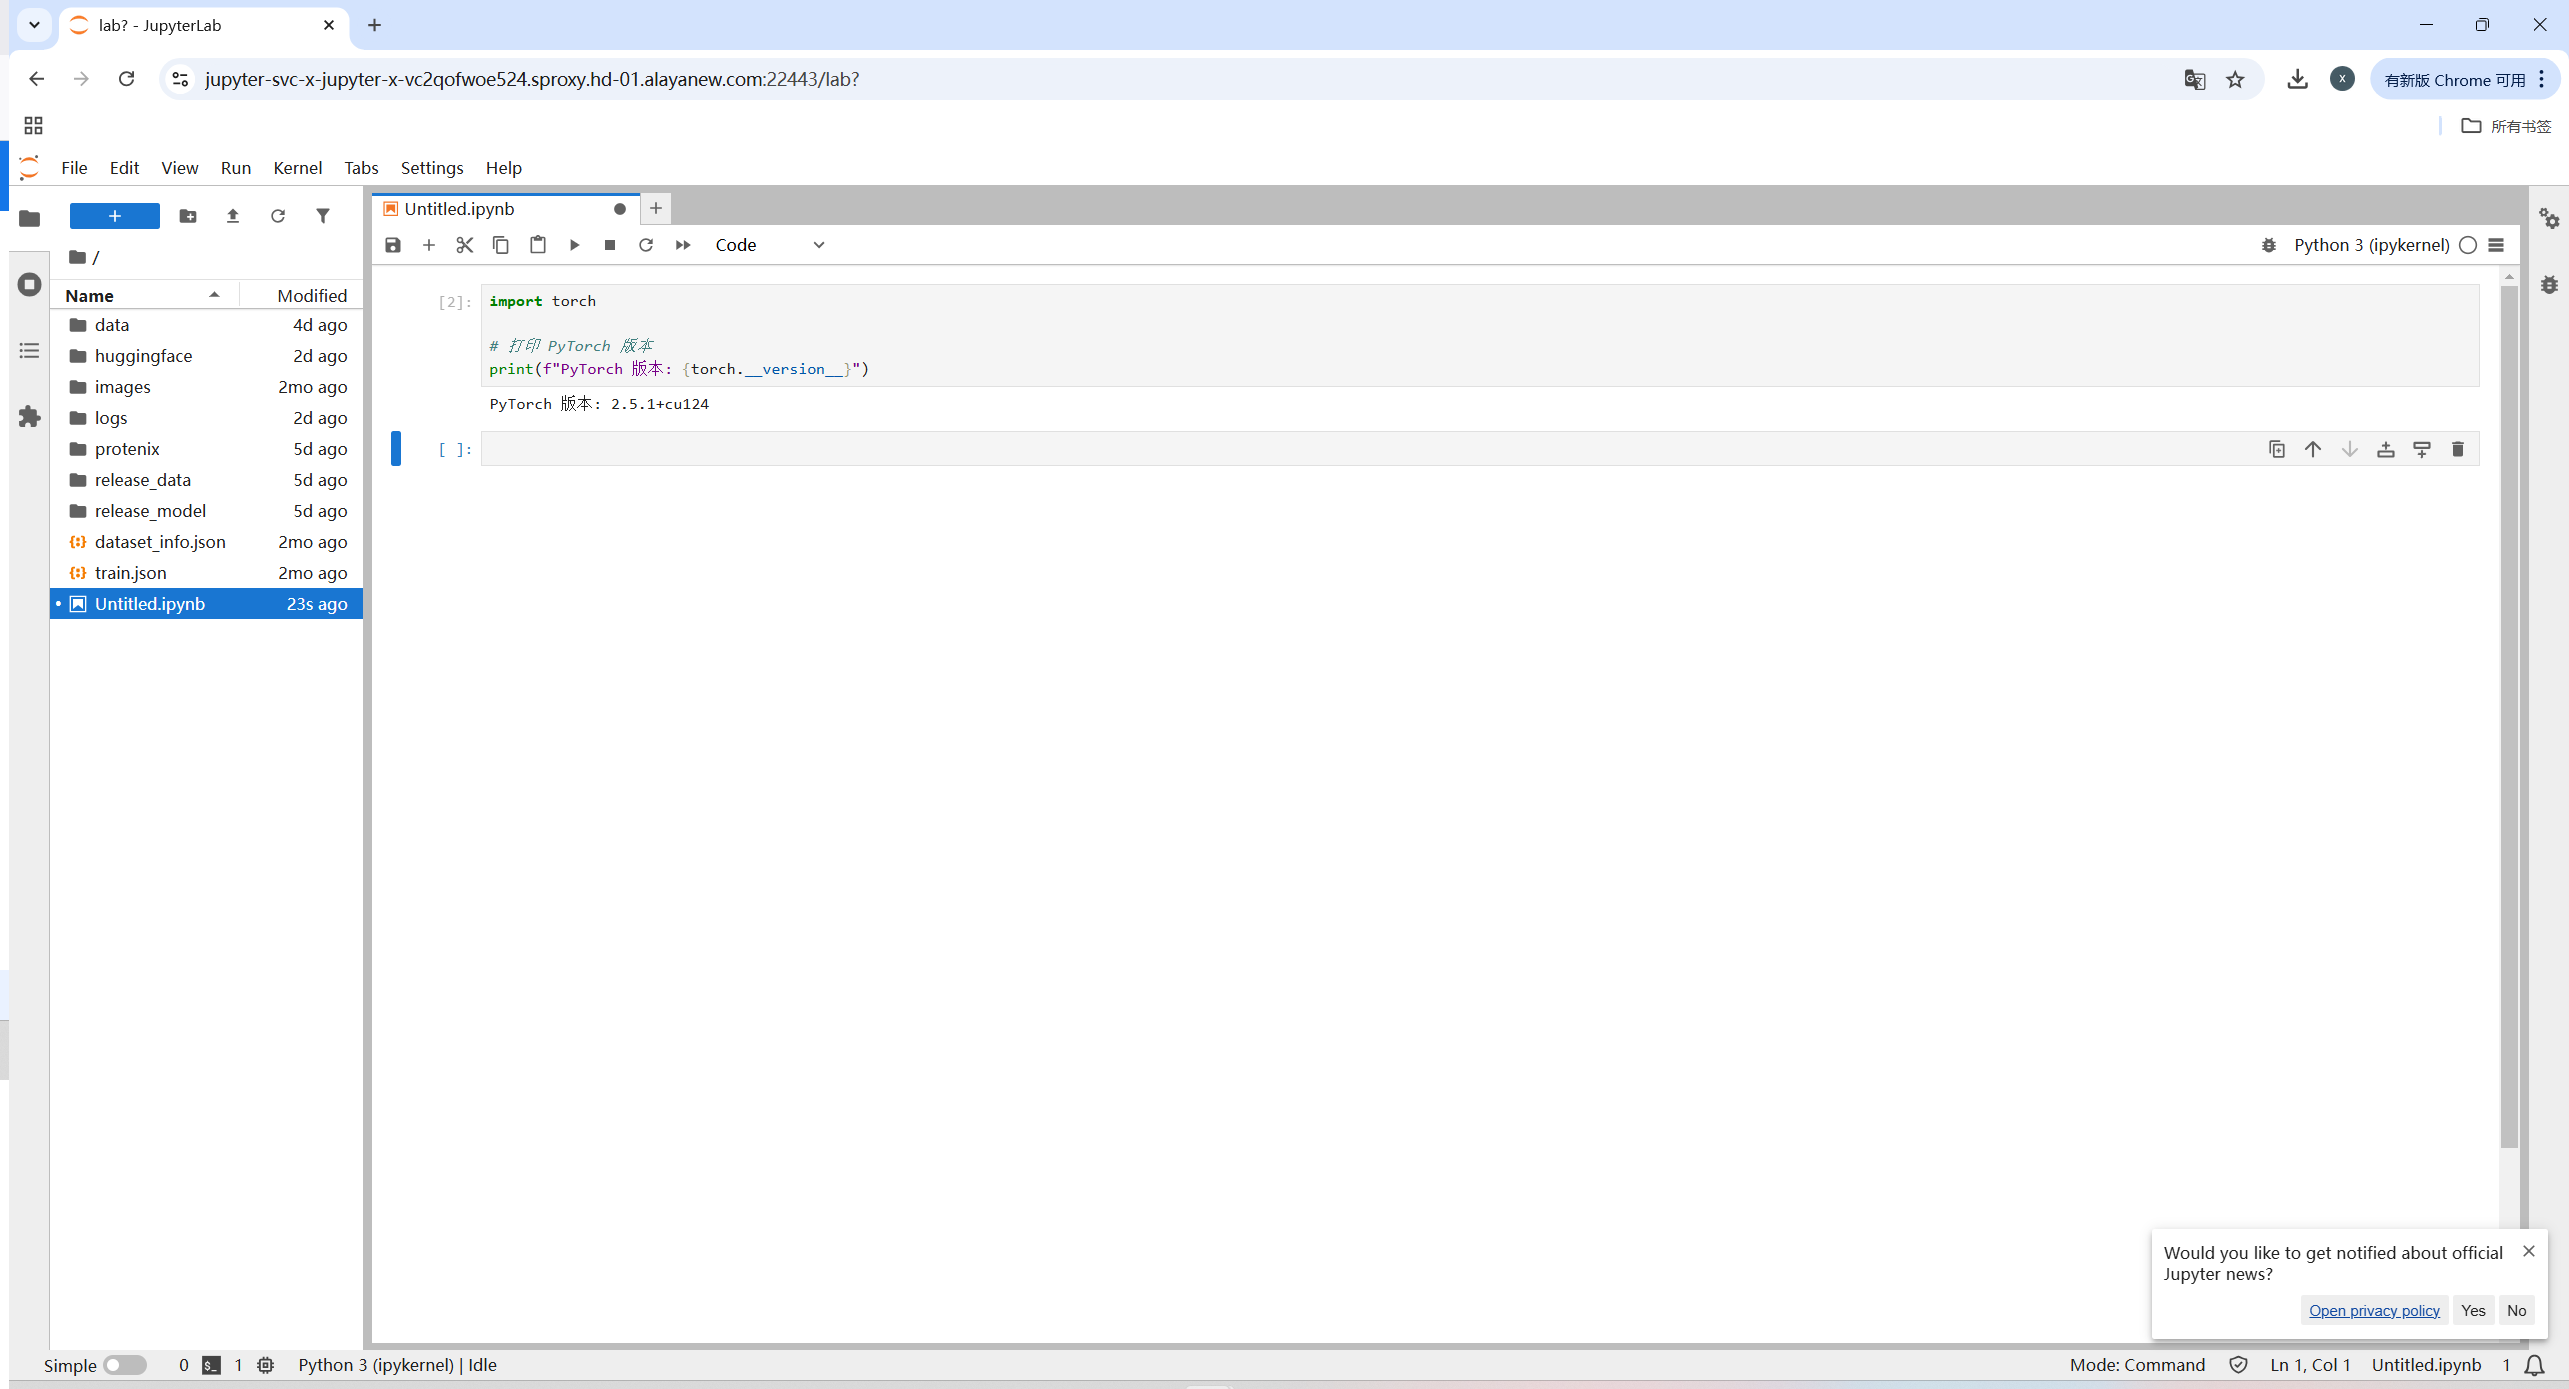
恭喜你!你已经在弹性容器集群上部署了一个运行Jupyter notebook的PyTorch实例!